Low on time and money this holiday season? Need some quick crafts from upcycled materials you already have on hand? Here are three vintage holiday cookie cutter crafts for kids and adults – salt dough ornaments, upcycle paper 3-D ornaments, and cookie cutter garland. These cookie cutter crafts are so easy even I can do them! 
3 Upcycled Cookie Cutter Crafts
I really like the upcycled, whatever-I-have-on-hand nature of these crafts, but you can go out and purchase special supplies like specific craft paper and holiday trimmings, of course!
For each craft you will need an assortment of simple cookie cutters.
Cookie Cutter Dough Ornaments
The most traditional way to use a cookie cutter for quick crafting fun is to make actual cookie ornaments. Traditionally, these ornaments would be made of hard gingerbread that could be eaten or hung on the Christmas tree, or both.
- Click here for a Healthy Gingerbread Recipe – look for the recipe for the first house.
- Strength and Sunshine can teach you how to make Cinnamon Cookie Recipe for Ornaments.
The Victorians and even Charles Dickens can be credited with making popular the German tradition of bringing an evergreen tree into the house for the Christmas celebration.
The idea grew in popularity from there but, even so, for a long time most families didn’t bring their tree in and decorate it until Christmas Eve. So, the idea of an edible ornament wasn’t that big of a deal and a very economical choice.
Which Dough Ornament is Best?
We’ve made gingerbread ornaments before, and we’ve also made salt dough ornaments. My husband even mixed up a ceramic-type material in his civil engineering lab one year that we used for ornaments. Of all these, the salt dough has held up the best over the years.
These certainly won’t last forever, but they’re an easy cookies to make and fun to paint.
We’ve used these ornaments to decorate for Valentine’s Day, Easter and Halloween – Christmas is not the ONLY holiday for which we feel the need to decorate.
The recipe for these can be found in our e-book, The 12 Days of Christmas. We share it here for your holiday enjoyment!


Salt Dough Ornament Recipe
Ingredients
- 4 Cups of flour
- 1 Cup of salt
- 1 1/2 Cup water
- 5-10 Drops Food Coloring optional
Instructions
- Mix flour and salt.
- Slowly add water and mix with your hands.
- Knead the dough a few minutes until it’s clay-like. If you’ve ever made play dough, this is very similar.
- Add food coloring to dough, if desired.
- Roll out the dough on a floured surface and use holiday cookie cutters to cut out shapes.
- Ornaments should be 1/4 inch thick and no more.
- Make a hole at the top of each ornament with a toothpick or skewer.
- Bake the ornaments at 300f/150c for 40 minutes, or until they harden. Be sure to check them so that they don’t burn if your oven runs hot.
- After they cool, paint the ornaments with acrylic paint and allow them to dry overnight.
- String a ribbon or hook through the hole and hang them on your tree - or give them as gifts!
Notes
Cookie Cutter Crafts – Balls and Ornaments
The following ornaments might be too advanced for a really young child, but the eight and up crowd should be able to make and enjoy them.
I like to have extra paper, glitter glue and pens on the table for my five year old to create her own masterpieces while my older kids are doing more advanced projects. She feels included and has time to do her own thing.
I try not to worry too much about what she “wastes” as she engages in this type of learning – nothing is wasted if she’s learning to be creative. I do tend to give her more cost-efficient items to craft with, though.
This cookie cutter craft can be used as an ornament for any holiday or an elaborate gift tag.

Cookie Cutter Ornaments
Equipment
- Cookie Cutters in simple shapes like hearts, stars and circles
- Pencils or Pens
- Ruler for squaring off edges, if needed
- Scissors
Ingredients
- Cardstock paper of various colors and patterns - old greeting cards work well
- Glue Dots or Strong Tape
- Twine or Ornament Hooks
Instructions
To Begin Cookie Cutter Ornaments:
- Pick your paper. Both sides of your paper will be visible, so keep that in mind as you choose it.
Use the cookie cutter to trace a shape onto your paper. - Cut out one shape and use it as a template to cut out at least nine more, for a total of ten. Keep your shapes simple. These ornaments end up being three dimensional and complicated shapes (like Santa or the Easter Bunny) won’t really translate well.
- After you’ve cut out ten shapes, fold each in half on both sides. So, fold one side in half vertically. Flip it over and fold it vertically on the other side. This will create a flexible, vertical crease in the middle of your shape.
- Stack the shapes as uniformly as you can and vertically bend them in half all together, back and forth. This will increase the flexibility.

MAKING THE PAPER 3-D ORNAMENTTo form the paper ball from your cookie cutter paper shapes:
- Place two staples, one at the top and one at the bottom of your stack. Orient the staples so that they, too, are vertical and directly inside the fold mark.
- If you can’t get a staple in that space, you may also use thin, flexible wire to wrap the entire stack of paper cutouts along that vertical fold line. Securely twist the wire at the ends, using them to create a hook from which the ornament can hang. Securing the stack keeps the ornament from falling apart up the center.
- Beginning at one side of your stack of cutouts (it’s basically divided into halves by your staples or wire), place one glue dot at the top of one cutout in the stack and secure it to the top of the next cutout in the stack.
- Then, place a glue dot on the bottom of the already secured cutout and secure it to the next cutout in the stack at the bottom.
- Alternate top and bottom glue dots until you’ve gone halfway around your stack of cutouts.

PLACING A HOOK LOOP AND FINISHING:
- Pause halfway through your ornament assembly. If you want to place a ribbon, loop of twine or even a pipe cleaner in the center of your ornament to create a hook from which it can hang, now’s the time.
- Make a loop and tape it securely into the center. It will be hidden from view by further alternating of glue dots as you finish your ornament. However, keep it tidy on the inside, just in case.
- Continue alternating glue dots to secure the tops and bottoms of each cutout. You should be able to see the pattern of alternating top and bottom by now – it creates a kind of accordion effect.
- After you’ve secured all your cutouts top and bottom, gently bend and adjust them to even out how they open. Watch out you don’t exert too much force and pop open one of your connections.
- Use extra glue dots if you need them to reconnect cutouts.

Notes
No Glue Dots?
No worries! If you don’t have glue dots on hand, you can also use plain tape to connect your cutouts. Hiding the tape by rolling it and putting between the cutouts won’t work because of the amount of force exerted upon each cutout once the ornaments is finished.
You’ll need to use small pieces of tape to go over the edges of both cutouts, so use clear tape that will be easier to hide.
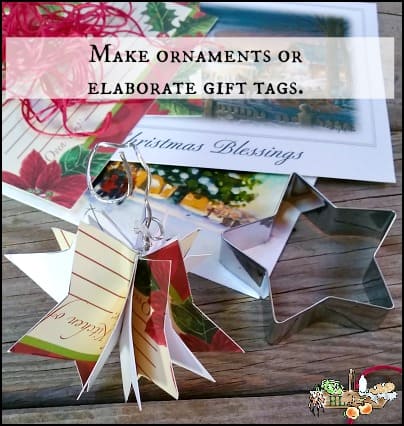
To Make a Gift Tag Instead
If you would rather use this ornament as a gift tag, leave your last cutouts unglued. This will keep the back flat so you can write on it. I would suggest writing on it before you start applying the glue dots.
You can also simply use a flat piece of holiday paper and any cookie cutter as a template. Flat gift tags are where you can use your fancier cookie cutters that were too complicated for the 3-D ornament balls.

Cookie Cutter Craft Garland – Don’t Throw Away the Old Ones!
My mom still has the plastic cookie cutters from my youth – just looking at them makes me nostalgic and happy. Some of them have really intricate designs and others are simple, sweet shapes from a now vintage era.
As we trade out our old cookie cutters for newer, sturdier, stainless steel ones I certainly didn’t want to throw the old ones away! So, we turned them into a garland and now we can enjoy them every year as a decoration.
To Make a Cookie Cutter Craft Garland:
- Tie twine, thread or ribbon on each cookie cutter somewhere near the top in a line. If the cookie cutter is longer than it is wide, tie onto it in two places at the top so that it will hang evenly.
- Leave at least four inches between each cookie cutter and tie the next one on.
- Finish with ribbon at each end.

Other Cookie Cutter Crafts
Other Cookie Cutter Crafts


DIY Cookie Cutter Birdseed Ornaments

10 Crafts to Make with Cookie Cutters
—>>> Pin This for Later<<<—


Leave a Reply