Here are simple, FREE instructions for a DIY compost tea bucket. Also, information on compost tea and how to make it. You’ll need a few tools and some low cost materials to that might just be sitting around the homestead. Start brewing your compost tea today with this simple compost tea bucket!
Have you ever thought what your garden would order at the local snooty organic restaurant?
- Maybe some fresh rain water to drink for starters?
- Then some sunshine as an appetizer?
- Most definitely the main course would have to be Chicken Poop Soup!
What is Chicken Poop Soup – or Compost Tea?
Compost tea is just what it sounds like – tea made from steeping compost in water. Much like an herbal tea, compost tea needs quality ingredients and the right amount of infusion time to produce a quality finished product. Compost tea is a really nice homemade replacement for commercial liquid fertilizer.
Using a tea is often more convenient than slopping around a top dressing of regular compost. Compost tea can also be used with indoor plants, hardened off seedlings and in tight spaces like cold frames. Plus, compost tea is super concentrated and works quickly. If you have struggling plants or newly planted ones that require a boost, compost tea is a really nice fertilizer to use.
How to Make Compost
Still learning about compost? No worries! So are we and we’ve been gardening since childhood. Here are some compost posts that will help round out your compost education.
- What’s the difference between compost and mulch?
- How to Make Compost for Beginners from Attainable Sustainable.
- Here are 3 Reasons to Use a Compost Tumbler – they do have a cost, but they’re SO easy to use!
- How to Build an Easy Compost Bin Using Pallets from Lovely Greens.
- 100 Things you Can Compost from Small Footprint Family.
- Making Compost in the Winter from Schneider Peeps.
Speaking of Schneider Peeps, Angi is a garden guru for me and has a lot of great gardening information on her site. Every year, I take notes in her Garden Journal, which is highlighted below. A lot of those notes are about compost – what to grow for compost, what went into my compost, how to improve my compost, etc. It might be valuable to you, too, so I encourage you to check it out!

Making Compost Tea
To learn more about what compost tea is and why you might want to brew some for your garden, please visit these handy links:
Compost Tea with Plants
To learn to make compost tea with plants, you’ll probably start out with comfrey. Comfrey is an amazing compost crop and you’ll read about it a lot if you start researching permaculture.
Don’t know what permaculture is? Here’s a post to explain the basics – click here.
To learn to make comfrey tea (as well as other things you can do with comfrey), please visit this post from Tenth Acre Farm – 7 Ways to Fertilize the Garden with Comfrey.
Don’t have comfrey on hand? Try alfalfa! Learning and Yearning explains the great benefits of using alfalfa in the garden, including as compost tea.
 Compost Tea with Manure
For those homesteaders who keep animals, making a manure tea might be easier than a plant-based manure tea. If you have livestock, you know that they poop. A lot. And the poop is very useful in the garden!
Here’s a thorough article from Frugal Chicken on making compost tea with rabbit manure – click here. She also has an article that covers making manure tea with chicken droppings.
DIY Compost Tea Bucket:
Materials:
½” PVC parts (all available at local home store) – one of each:
- Elbow
- Threaded male adapter
- Threaded female adapter
- Ball valve
- 1 ft schedule 40 pipe
Other parts:
- Straw
- One good bucket
- Rubber gasket sheet (3” by 5”)
- Bunch of chickens who poop
Tools:
- Drill with 7/8” hole saw bit. Be sure to size it to fit over the male threaded adapter.
- Rubber gasket sheet
- Ratcheting PVC cutter
- Razor knife or scissors
- Pliers or adjustable wrenches

Getting Set Up:
To begin:
- Make sure your drill bit fits over the male end adapter.

- Drill a 7/8” hole near the bottom of the bucket on the side 1” up from the bottom of the inside.

- Use a razor knife or scissors to cut out two gaskets with the holes centered. Use the bit to cut holes in the rubber gasket sheet one inch apart.

- Place the two gaskets over the threads of the threaded adapter and place the threads through the hole just cut from the inside of the bucket.

To Connect Parts for the Compost Tea Bucket
- Screw the two adapters together with the male and female ends, sandwiching the gaskets inside the bucket wall.


- Cut a couple of 2” sections of pipe and a 3” section.
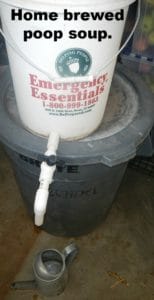
- Insert a 2” pipe section into the outer adapter, then the ball valve, then another 2” pipe section, then an elbow and lastly the 3” pipe section pointing downward. See below for an illustration.

Note:
We chose not to glue the joints because there is not enough pressure to make it come apart. Unglued, we can then dismantle the piping at the end of the season and store the parts inside the bucket. This also makes it much easier to clean the parts when needed.
Using the DIY Compost Tea Bucket!

- Place some water in the bucket with the ball valve closed and check the effectiveness of the gasket seal. If it leaks, use a couple pairs pliers to tighten the adapters.
- When it passes without leaking, empty the water and place enough medium sized stones to cover bottom, about 6 inches of straw on top of that and about 6 inches of chicken poop (or a chunk of whatever you shoveled out of your coop) on top of the whole thing.
- As an alternative, you can forgo the stones in the bottom and place the compost in a burlap or other porous bag. The stones act as a filter at the bottom to keep chunks out of the pipes and tea. If it’s easier for you, you can just place the manure in a bag and put the bag in the bucket.
- Place the setup on a table or wall outside near a water source in a sunny location.
- Add water up to the top and cover.
- Wait a couple of hours or a day. The longer it sits, the more potent the compost tea will be. I recommend 5 to 7 days for a good ferment.
- Place a watering can below the spigot and open the ball valve. Fill the can and use it on your plants!
To Re-Use the Compost Tea Bucket
You can refill the same bucket with new water until it runs “clear” and you know all the good poop is gone. Empty the bucket contents into your compost pile and do it all again. Remember to replace your rocks, if you’re using them.
Only a gardener can appreciate the smell of the product that will leave your plants wanting to give you a tip for the best meal they have ever feasted upon.
Bon Appetite Garden!
Composting Resources
Here are a few more helps when it comes to learning about making great compost and how to use it.
Composting Resources


How to Make Organic Mushroom Compost at Home - Real or Mock!

How to Compost Weeds the Safe Way

How to Make Worm Casting Tea to Use at Any Garden Stage {EASY}

7 Comfrey Uses in the Permaculture Garden
Cover photo gratefully attributed to this Pexels user.


This is absolutely ingenous! Can’t wait to make one. So, you’re supposed to pour it on the compost and not on your plants? Thanks for the info and great pictures as a tutorial! Vickie
Glad it was helpful! The idea is, you’re brewing your compost like you would a cup of tea. The bucket is your tea pot and the spigot is your spout. You put your “tea leaves” (your chicken poop with maybe some straw in it, compost from your compost bin or whatever muck you have) and then add water and let it steep. When it’s sat for awhile you empty your pot through the spout into your tea cup (your watering can) and pour it onto your plants for a stinky but nutritious tea party! You can put more water in your “pot” and re-use your first “tea leaves” until the water that comes out of your spout runs clear. After that, dump your first “tea leaves” and refill your “pot” with more chicken poop muck. Goat poop works nicely, too. Any barnyard poop will do!
Do you have a suggestion on how to get around using PVC for the spout? I am not a big fan of PVC for health purposes.
You could use a similar width metal pipe, but make sure you use some kind of washer if you find the metal and plastic bucket don’t bond well and it leaks. Although, come to think of it, it probably wouldn’t leak much and, in this case, a little leaking might be beneficial. 🙂 I have struggles with plastic and plastic type products, too. Fortunately, a plant’s root system is a great filter for many things. Ever pray over your food? We do and contaminants are a big reason why.
Very informative and useful. Thanks for sharing with us at The HomeAcre Hop!
Please join us again Thursday for our special harvest themed hop at:
https://summersacres.blogspot.com/2013/10/the-homeacre-harvest-hop.html
~Ann
I like this idea a lot. I will build one later this winter or early spring. Thank you for sharing on Rural Wisdom and Know How #3
So glad it was helpful! We usually have around three going during the growing season and put them around the gardens for easy access. You end up getting it on you no matter what you do but at least you don’t have to tote it as far if it’s got it’s own space in the garden. 🙂
Great article! Just found you through the FB Old Paths Group.
So glad you stopped by, Jenn! That’s a great group!