If you love fresh linens but are tired of buying single use herbal sachets, here’s a DIY tutorial for making your own re-usable lavender sachet. There are two sets of instructions; one for a quick lavender sachet that requires minimal sewing, and another that’s slightly fancier so that you can use it in place of single-use wrapping paper. Make these re-usable lavender sachets for your own linens or as a gift for someone special. 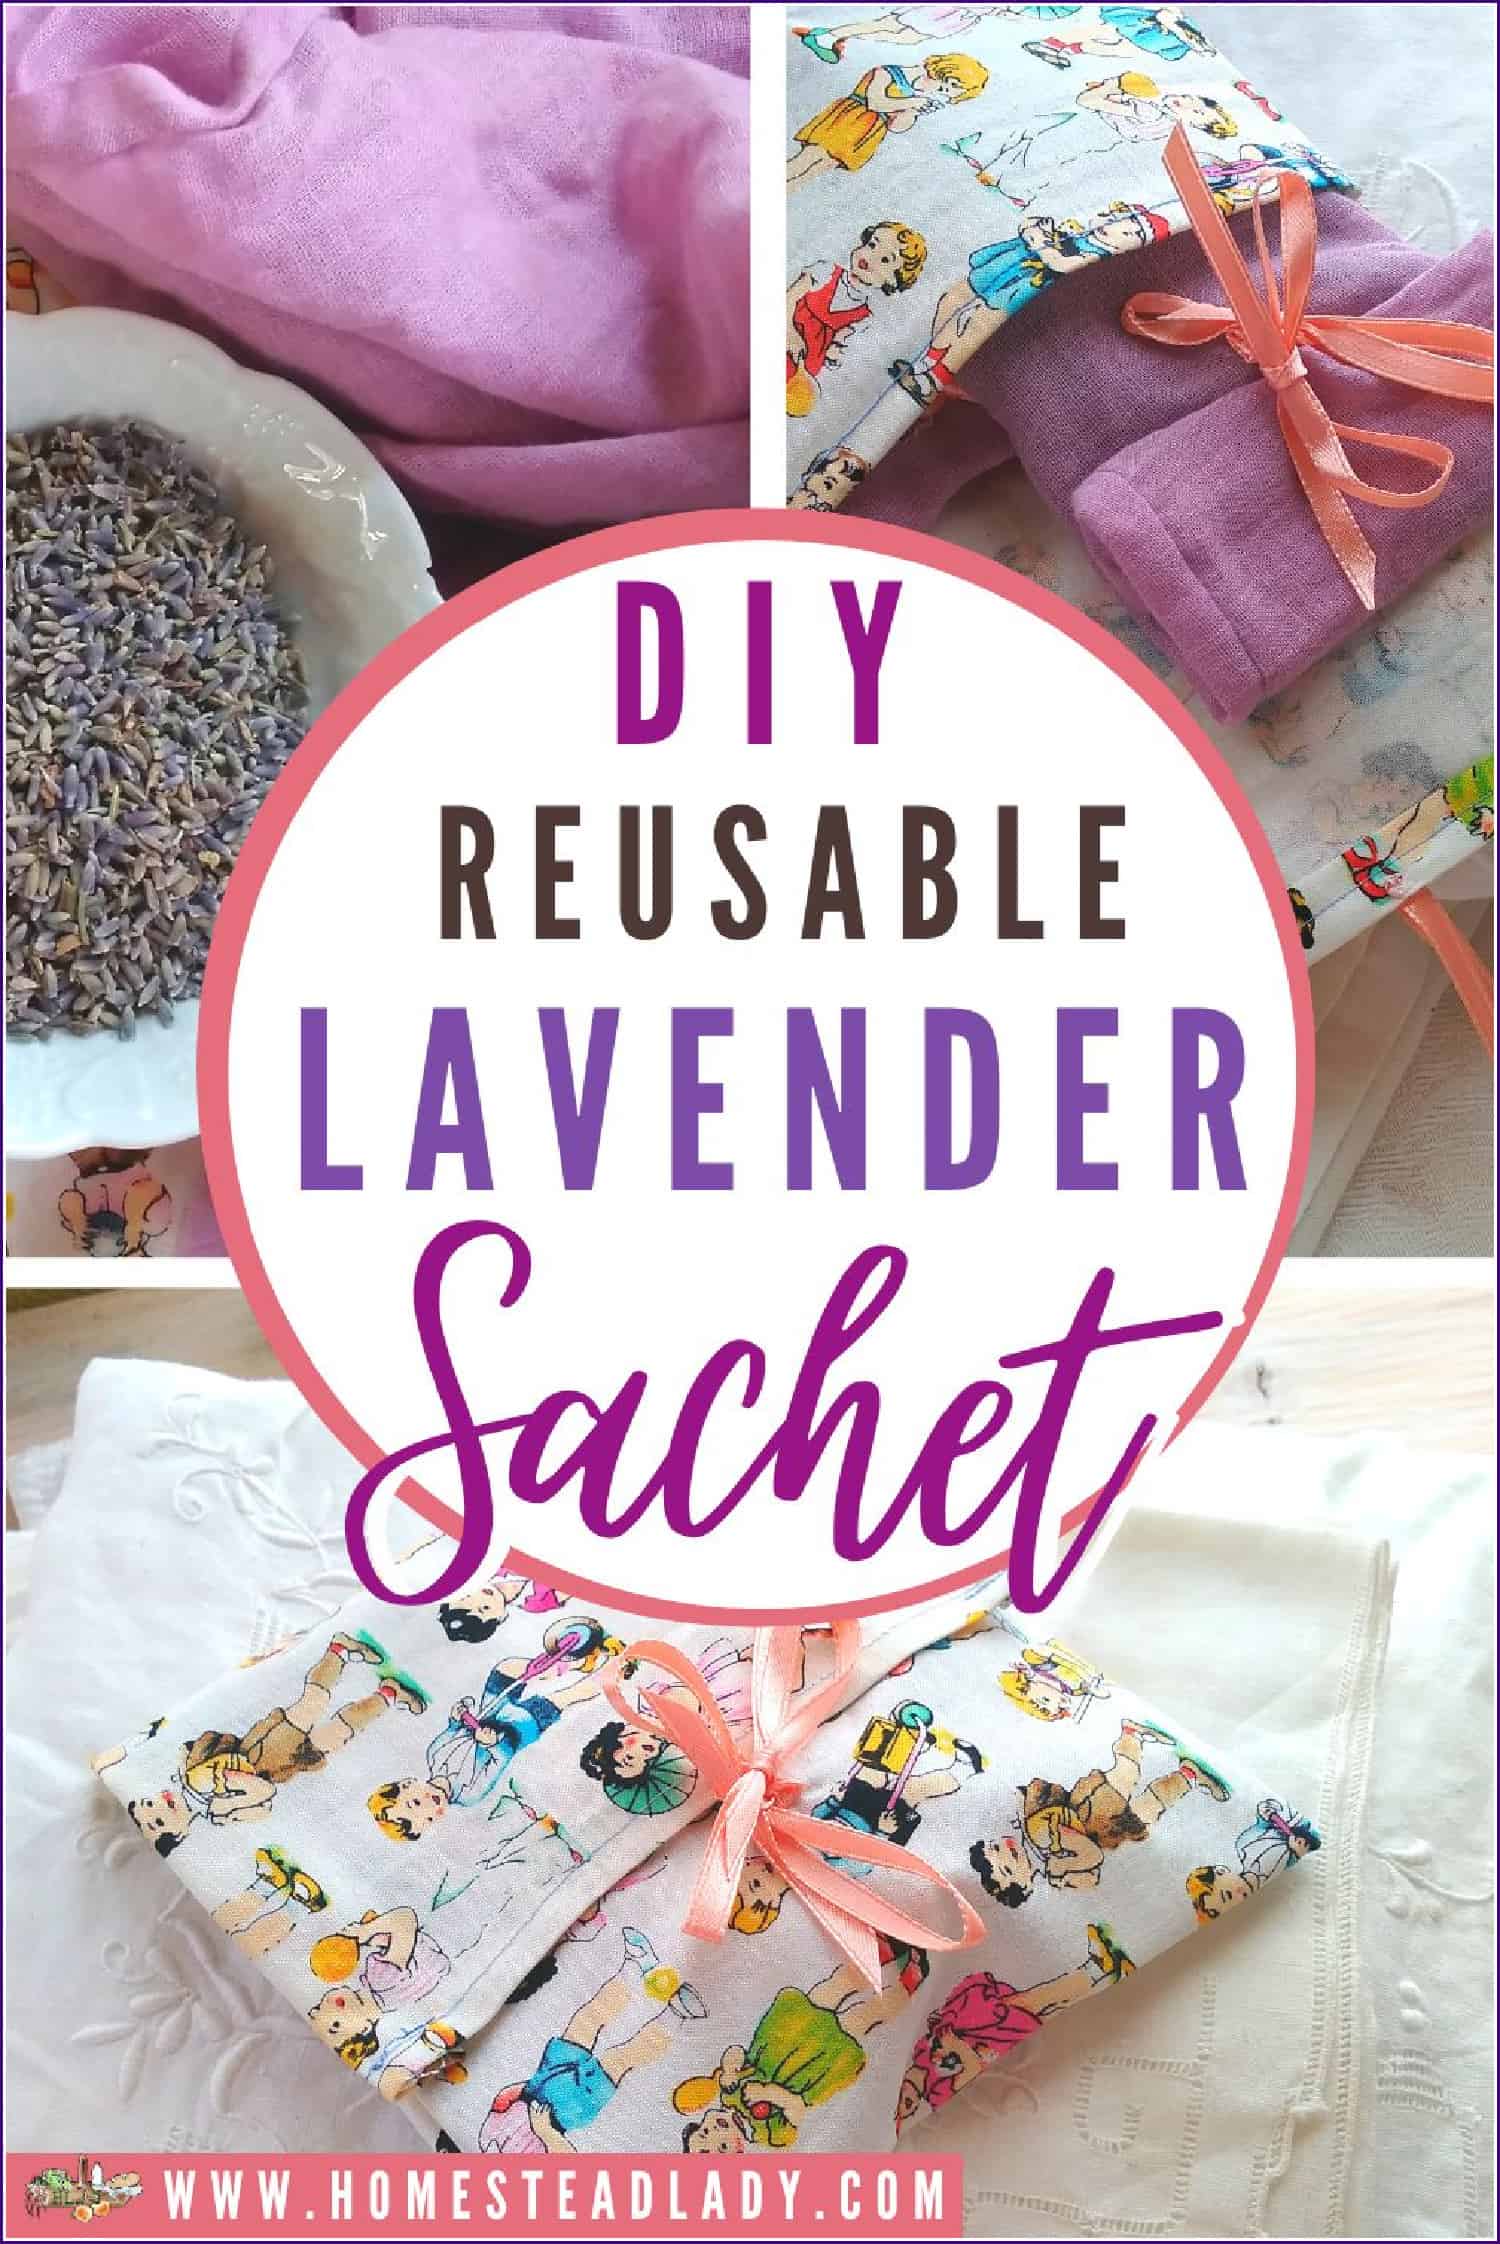
Lavender Sachets and Linens
I now live in a 150-year-old house in rural Missouri. I’m from northern California where the air is dry and fragrant with orange blossoms in the spring.
It wasn’t until I moved to North Carolina and now Missouri that I finally understood why ladies stuffed herbal sachets in every corner they could back before central heat and air. My Victorian house is so porous despite updated windows, doors and insulation that I get mold inside, if I’m not vigilant. I have to do very Victorian things like “air my linens” about halfway through the summer.
I run dehumidifiers upstairs and down to prevent that moldy smell on the books and the violins. It’s a constant battle, I tell you!
Lavender sachets are one more thing I use to keep my linens and drawers smelling sweet and fresh.
“Let us revive the ancient love and appreciation of this flower! Let it perfume our linen, our baths, and soothe our nerves with its fragrant tea. Let us honor our gardens with this ancient patrician plant that stands on its simple suit of silver and purple…”
– Mrs. H.E. White, The Gardener’s Monthly and Horticulturalist, Vol. 22. No. 263 (November, 1880)
How to Grow Lavender
Here’s a short excerpt on lavender from our book, The Potted Herb, which details a few, simple herbs you can grow in pots. This book is particularly well-suited to new herb growers, as well as those who need to grow in containers for one reason or another.
“Legend has always held that lavender is a powerful love-inducing and protective herb. The Ancient Arabs, Greeks and Romans all used lavender for its antiseptic, sleep-inducing and stress relieving qualities, too.
“Lavender Cultural Requirements for Growing:
- Botanical name: Lavandula
- Site – Sunny, but can tolerate some shade – it will flower less in the shade
- Will grow well in zone 5 and above
- Perennial
- Soil – Light and well drained
- Tolerates poorer soil
- Propagation – front soft or semi-hardwood cuttings; seed
- Lavender seeds germinate between 10 and 28 days. Germination of English types ( angustifolia) is frequently below 50 percent; scarification or freezing of seed flat can sometimes improve germination rates.
“Lavender Tips and Tricks:
- Lavender is vulnery, anti-microbial and pain-relieving (anti-inflammatory), and mildly sedative.
- During the Black Plague in the 16th century lavender was taken to ward off the disease. Bunches of lavender were sold in the streets in an attempt to ease the smell of the sick and the dead.
- To add natural fragrance to your carpet, drop dried lavender buds down before using the vacuum.”
To get your own copy, simply click below.

Lavender and Its Uses
Lavender is my absolute favorite flowering herb – it might be my favorite plant, period. I love to grow it, dry it and use it. I realized one more reason why Devon Young of Nitty Gritty Life and I are friends when I read this in her book, The Backyard Herbal Apothecary,
“There are other herbs. There are other flowers. And then there is lavender. …I can never pass a lavender spike without running my fingers through the foliage and buds. To me, lavender is practically the perfect plant.”
Devon’s book can tell you how to grow lavender, how to use it and why you should – she even has a recipe for you to try. She does this for all of the herbs she’s highlighted in her excellent book, both those you can grow and those you can forage in the wild.
Her book has quickly become my go-to herb book. In fact, I’m going out with it tomorrow to my fields to harvest some common daisies to make a special salve for my dancer/athlete children. I digress – back to lavender.
If you’d like to sample Devon’s writing, try the following post on the medicinal uses and health benefits of lavender.
DIY Re-Usable Lavender Sachet
As promised, this tutorial is separated into two sections – the super quick lavender sachet and the slightly fancier lavender sachet.
I do love a good herbal linen sachet but one of the things that bugs me when you buy them, even if they’re hand-crafted, is that they’re single use. Eventually, the essential oils that make the lavender effective in fighting off mold and mustiness dissipate. Plus, the lavender blooms themselves disintegrate over time.
I want to be able to replace the old lavender with new blooms without having to pick apart the seams of an otherwise lovely linen sachet. I got tired of messing with it and started to make these sachets that tie closed. Because of the tie, I can open and replace the lavender blooms as often as I need throughout the year.
Simple Re-Usable Lavender Sachet
Materials
- Natural fiber material like linen or cotton
- Sewing thread
- Sewing needle
- Sharp scissors
- Iron and ironing board
- Straight pins
- Ruler
- Sewing machine, optional
Initial Instructions
For this tutorial, I’ve used a soft muslin with a pretty loose weave. This kind of fabric is great for allowing the fragrance to flow freely from the sachet to my linens.
However, it can be a little finicky to work with because it’s so floppy and likes to move around while you sew. If you’re new to sewing, try a stiffer cotton fabric or linen – something that has a little body to it. It will still allow the fragrance into your linens, never fear.
Machine Sewing Note
I feel I should note here that I’m as precise a seamstress as I am a chef; which is to say, not very. Moreover, I don’t really enjoy sewing as much as I might. I don’t hate it, but I’m only ever at my sewing machine when I NEED to sew. I rarely sew for pleasure.
If you are a recreational seamstress, I hope I don’t annoy you with my brevity and very utilitarian design. I go for the quickest, easiest way to sew what I need and get out from behind my sewing machine.
Also, if you are new to sewing, I hope that my efforts to keep this tutorial simple and easy to follow bear fruit. If you have questions, or you find a glaring omission in my instructions, please don’t hesitate to call me on it.
Hand Sewing Note
If you prefer to sew this by hand, you absolutely can! The instructions here are nothing but a collection of straight stitches and seams. Nothing too fiddly to do by hand – in fact, a few of the stitches require hand sewing.
I used to hand stitch just about every small project I made because that’s what I prefer. However, loss of mobility in my left hand has made machine sewing a necessity for me. Do whatever is comfortable for you.
Instructions for Simple Re-Usable Lavender Sachet
Here’s a quick instructional video for you visual learners and beneath that are more detailed instructions.
Prepare the Fabric
- Iron a piece of natural cloth using steam.
- Consider the rough size you desire in your finished product and double it. For this tutorial, I used a piece of fabric 8″ x 8″. You will be folding this piece in half to form the body of the re-usable lavender sachet. If you can, maneuver your fabric so that you have a selvage edge at the top of your fabric where the top of your sachet will be. If you can’t, don’t fret.
- Fold the piece over, right sides together (if you have a right and wrong side to your fabric). You can iron it, if you wish, to keep it flatter. Trim off any loose threads.
Sewing the Lavender Sachet
- Beginning at the bottom, sew a ¼” seam along the bottom of the lavender sachet.
- Turn at the corner to sew a ¼” seam up the side as well. To turn, pick up the presser foot and manually turn your sachet body so that you can sew up in the correct direction. Replace the presser foot and sew your seem.
- Always be sure to begin and end your seam with a knot by moving back and forth over the seam once or twice. Clip the threads.
- Trim your seam edges if you like them super tidy and turn your sachet right-side out. You may use a chop tick or dull pencil to push out your corners, if you like them crisp.
Sew the Top Hem
If you left a selvage edge at the top of your sachet, then you’re done forming the body of your lavender sachet. If not, you’ll need to top-stitch a hem to keep loose edges from fraying.
- To finish the top of your sachet, fold the top down 1/4” and then another 1/4”. This will give you a ¼” hem, which is adequate. Pin this hem, if you like, or iron it to keep it in place.
- If you can, remove the tray from your sewing machine to make the sewing space narrow. Slip your sachet over the sewing area, like putting an arm in a sleeve. This will keep the body of the sachet out of your way while you sew. If you can’t remove the tray, simply put the hem-edge of your sachet top under your needle and needle down. That is, place your needle inside the fabric to keep the fabric in place.
- Engage the presser foot to further keep the fabric in place. Before you begin to sew, make sure that the body of your sachet is removed from the path of your needle.
- Begin to stitch the hem, stopping every now and then to make sure the body of your sachet is out of the path of your needle. Sewing in a circle can be tricky, but this is really the only hard part of this operation – you’re doing great!
- Remember to stitch a knot in your hem by going back and forth over it once or twice. Clip your threads.
Prepare to Sew on the Ribbons
The ties are what make this sachet re-usable and ultimately functional. Some people like to create a drawstring bag for linen sachets but the fabric can get bulky at the top and hard to pull closed.
You could also use a button and thin ribbon to create an opening mechanism for your sachet, but I don’t like to worry about tension in the placement of my button. If I don’t place the button just right place and/or if the thin ribbon or string I choose isn’t tight enough, the sachet might open.
I find ties to be easier and easy is what I like. Here’s a quick video to show you how to attach the ribbon ties, and then there are more detailed instructions below.
- Fold the top of your sachet down an inch, or so.
- Then, fold it down again. Mark where this fold lies on the sachet with a straight pin. Folding the top down twice will ensure that your lavender doesn’t spill out while in use.
- Place another straight pin just below the first. These two pins mark where you will hand stitch your ribbon ties onto the sachet. Don’t worry – you’ll need to sew about ten simple straight stitches to attach the ribbons. You can do it!
If you can’t, please consider this course from my friend Angi who is gifted at teaching basic hand stitches here:
To Attach the Ribbons
- Choose a ribbon that is thin and easy to tie.
- Cut two lengths of ribbon 4-6” and fold them each in half.
- Place the folded end of one ribbon over the mark of your pin. Stitch this edge in place with five or six small, straight stitches.
- Fold the ribbon over itself about 1/8” to cover the edge of the ribbon. Stitch in place with five or six small, straight stitches. Knot and clip your thread. This will prevent the ribbon from fraying and will ensure that your tie is snuggly on your lavender sachet.
- Repeat this process on the other side of your sachet. Be sure to turn the sachet so that the ribbons ends are facing each other once sewn into place. This will make for easier tying and will allow the bow to sit flatter. If you make a mistake and sew the ribbons facing the same direction, never fear! You’ll still be able to tie them just fine.
- Remember, this is supposed to be fun. Stop and roll your shoulders, get a drink of water and find your happy place.
Filling the Lavender Sachet
Your sachet is now ready to filled with dried lavender. Be sure the lavender is fresh but very dry. We’re trying to reduce mold, not encourage it!
- Spoon the lavender into the sachet, roll the top down and tie it closed.
- Toss your re-usable lavender sachet into any linen drawer, or even your china cabinet. Put them anywhere that smells musty or boring.
- Repeat this process to make a dozen of these little sachets to stash all over your house.
If you grow your own lavender, you should be able to change these out twice a year, or more. If you don’t grow your own lavender, that could get a little pricey depending on where you source your blooms. Lavender really isn’t too hard to grow in the right climate – to learn how, try our aforementioned book, The Potted Herb.
Cover Sachet for Gifting or Storage
If the above sachet is too boring OR you’d like to have a way to easily toss in two sachets to one drawer, try making this slightly larger sachet bag.
You’ll need all the same materials except that you’ll want a piece of decorative fabric twice the size of your original piece. This should still be some nice, airy cotton or linen so that it will breathe. Otherwise, pick whatever pattern tickles your fancy.
Since I was making this for Mother’s Day, I chose a favorite vintage fabric from my stash. Aren’t those kids cute? I’m SUCH a girl when it comes to linens – I love fabric!
Here’s a short video tutorial and then there are more detailed instructions below.
Instructions
This sachet holder isn’t necessary for the sachets to work as linen enhancers, it’s just a pretty way to present your sachets. It’s especially useful if you’re trying to avoid using single-use wrapping paper – the pouch is the wrapping! To make it more decorative, I use two sets of ribbon on the outside of this larger sachet.
Quick Note
You can follow the exact same instructions for this larger sachet as you did for the smaller one. In other words, fold over, sew two sides, fold the top down, sew on the ties and you’re done! Or, you can take a little more time and sew nicer seams for a more tailored, top-stitched look as below. Just decide what you have time for – quick or quicker.
- Iron a piece of decorative fabric twice the size of your first piece – use steam.
- Cut the fabric to twice the size of your first. Again, use a selvage edge for the top, if you can. Sometimes the selvage is compromised by the color scheme on the fabric or the brand name. No worries, you can sew a hem at the top.
- To complete this larger sachet body, fold (from the right side of the fabric over the wrong side of the fabric) the top and bottom edges over 1/4″ and then 1/4″ again. Sew these down, using the presser foot edge as a guide running along the fold of the fabric. Remember to knot at beginning and end.
- Fold the other two side edges down 1/4″, and then 1/4″ again. Stitch these down, as well, remembering to knot.
- Lay the fabric out flat, right side up. Fold up the bottom third and pin. Stitch these sides down with a straight seam, using the presser foot as a guide along the edge of the fabric.
- Turn the sachet right side out. Use a chopstick to gently push the corners out, if you need to.
To Finish Off the Top
- Fold the top third down this time and iron the sachet so that it holds its form.
- To attach the ribbon ties to this decorative pouch, follow the instructions from above. I wanted two ribbons on this particular sachet cover, so I placed them side by side. However, one set of ribbons is sufficient.
- Place two lavender sachets inside this pouch to present as a gift – waaaaaaay better than wrapping paper.
If you’re giving this as a gift, be sure to brew up some lavender linen spray to tuck into the packet, too.
If you love the idea of handmade gifts but just can’t seem to get them made, please consider reading this article on planning handmade gifts for holidays all year round – click here.

Lavender is one of my favorite herbs and so wonderful for a variety of personal care products, including the skin. If you’d like to learn to use herbs to create your own skin care products, you may interested in the following course from Herbal Academy. Simply click below for more information:


Lovely post, but wouldn’t it be much easier to just purchase those large fabric tea bags (the ones for very large pots) and use it? I do it all the time. They hold a lot of lavender and can easily be re-used over and over again, and even washed.
Easier? Yes, of course! DIY? Nope.
If you have a fabric stash and want to use it up, or simply enjoy sewing something simple, then this is a great project. Especially if you’re teaching your kids to sew.
Sometimes, we discover what we’re willing to pay for and NOT make ourselves, and that’s valuable, too!