If you have one gallon of milk, you can make any of these five homemade dairy products: yogurt, yogurt cheese, whey, cultured cream, and paneer. Each is simple to make and versatile to use, as you will see from these tutorials! 
Fresh Milk Vs. Store Milk for Homemade Dairy Products
Or raw milk vs. pasteurized milk.
If you don’t consume raw milk, then just skip this and go to the next section because this won’t be a paragraph convincing to drink raw milk.
The first thing to remember about raw milk is that it will culture, not spoil. So, you can use raw milk and raw milk products to infuse live, active cultures and probiotics into various food preparations.
Here are a few more things to know about how to use raw milk:
- Pre-soak oatmeal (among other things) overnight with a little raw milk, raw milk kefir, or raw milk yogurt and enough water to cover the rolled oats then simply cooking it up in the morning.
- Add a touch of raw milk to ferment/culture breakfast batters likepancakes and set them out overnight on your counter.
- If you’re having trouble maintaining your milk supply while nursing for whatever reason, you can make a high quality raw milk formula using the Weston Price recipe.
- I feed raw milk to my baby chicks for their first month; it can also be given to other livestock.
- Raw milk can also be used to make various simple dairy products like ice cream, mozzarella cheese, feta cheese, and buttermilk.
And, of course, you can use raw milk to make any of the homemade dairy products listed below.
Other Dairy Resources
How to Ferment & Use Milk Kefir
Homemade Cinnamon Pumpkin Whipped Cream
5 Homemade Dairy Products
We’ll start with the dairy product you might be looking for in the store on a weekly basis – yogurt. Stop buying this one and start making it today!
Just as a quick side note: Learning to make homemade dairy products is a great way to preserve your dairy surplus. The dairy with the longest shelf life is cheese, but these other products can extend the life of your milk.
They also provide a way to use up fresh/raw milk that may have started to ferment, or culture past what is palatable for you to drink. In dairy language, we call this becoming sharp.
#1 Yogurt
Yogurt is an easy dairy ferment to do yourself because it’s simply heated milk mixed with a yogurt culture that sits for a few hours in a consistently warm place like an insulated cooler.
Once you start making your own yogurt you’ll slap your forehead and say, “I can’t believe I’ve been buying this for so long when I could have been making it!”
How to Make Yogurt
Here’s a quick recipe for yogurt:
- Place one gallon of milk in a medium pot on medium heat. You may stir in 1 tablespoon of organic beef gelatin to help with a firmer set and add nutritional value. This step is optional, though.
- Slowly bring the temperature of the milk to 180° F/82°C, stirring frequently. The longer you keep it at that temperature, the firmer your finished yogurt will be. A standard recommended time is twenty minutes. I usually get bored waiting after about one minute.
- Cool the yogurt to 120°F/49°C. You may place the pot into a sink filled with cold water to speed the cooling process but watch that it doesn’t get too cool.
- Place the milk into two glass quart jars (or one half-gallon jar) and stir in 1 tablespoon of yogurt, kefir, or cultured cream.
- Place the jars in an ice chest, Wonder Box, box dehydrator, sink full of warm water, Yogotherm, or any other place you can maintain the yogurt at temperature. Wrap the jars in a blanket for an extra layer of insulation. Leave the milk to culture for 12-24 hours.
The yogurt will be done when it has set up and has achieved the tang you find tasty. For sharper yogurt, culture a little longer.
Homemade yogurt might end up a little softer than commercial yogurt, but you’re also not eating a bunch of fillers and ingredients you can’t pronounce. And, the best part is you made it in your kitchen!
Please read this from Practical Self Reliance for a recipe for homemade drinkable yogurt.
#2 Yogurt Cheese
Once you’ve made yogurt, you can easily make yogurt cheese because all you need to employ a piece of cheesecloth to strain the yogurt.
Yogurt cheese is smooth and creamy, something like cream cheese. It makes an excellent breakfast cheese spread over toast or served with fruit.
How to Make Yogurt Cheese
Be sure to have a colander/strainer and a large piece of cheesecloth handy for this recipe.
- Place a cheesecloth over a strainer suspended over a bowl. Pour the homemade yogurt into the cheesecloth.
- Tie up the ends of your cheesecloth and suspend the yogurt over the bowl for eight hours or overnight.
- Remove from cheesecloth and place the contents into a bowl
- Mix 1 tsp of sea salt into the strained yogurt which has now become yogurt cheese.
You can also add sweetener to this recipe to make a spreadable dessert cheese. A recipe for maple yogurt cheese can be found below.
—>>Maple Yogurt Cheese Recipe<<—

#3 Whey
Whey is the cloudy, yellowish (if you’re using cow milk) liquid that you strain off when making yogurt or cheese. It is one of the proteins present in milk and has nutritional value which is why it is often used as a protein additive in smoothies.
When you make yogurt, you can harvest the whey in two different ways:
- After your homemade yogurt has set up completely, use a spoon or your finger to hold back the yogurt while you drain out available whey from the jar. Drink the strainings or add them to your smoothies.
- Make yogurt cheese and save what you drain off. Bottle and cap it, then store it in the refrigerator for about a week. It will continue to ferment the longer it sits.
We often use whey in soup broths and to make pots of rice. Delicious!
#4 Cultured Cream
Cultured cream is also known as:
- Crème fraiche
- Sour cream
Whatever you call it, cultured cream is a simple homemade dairy product that can dress up any baked potato, taco soup, or hash browns.
—>>>Click the link to learn how to make sour cream 3 Easy Steps<<<—

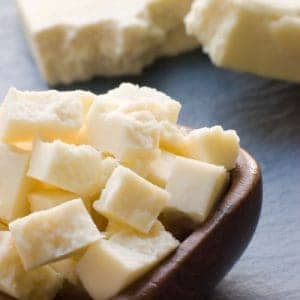
#5 Paneer
Similar to lemon cheese, aka farmer’s cheese, paneer is an Indian dinner cheese that is absolutely delicious. If you can boil milk in a pot, juice a lemon, and tie a knot, you can make paneer.
Basic Paneer Cheese
Equipment
- Cheesecloth
- Colander
Ingredients
- 1 Fresh Lemon Or 1/3 Cup Bottled Lemon Juice
- 1 Gallon Milk
Instructions
- Juice one lemon, or enough until you have 1/3-1/4 cup of fresh lemon juice. You may use bottled juice.
- Pour one gallon of milk into a large, heavy-bottomed stewpot on medium heat.
- Bring the milk to a boil, stirring constantly to prevent scorching. The boil should be consistent and rolling but not hard and riotous. If the milk isn't getting to a boil after being heated thoroughly, turn the heat up bit by bit to achieve a rolling boil.
- Once the milk is boiling, slowly stir in the lemon juice just until you can see the curd separate from the whey. It will look a bit like cottage cheese swimming around in your pot.
- Immediately remove from heat.
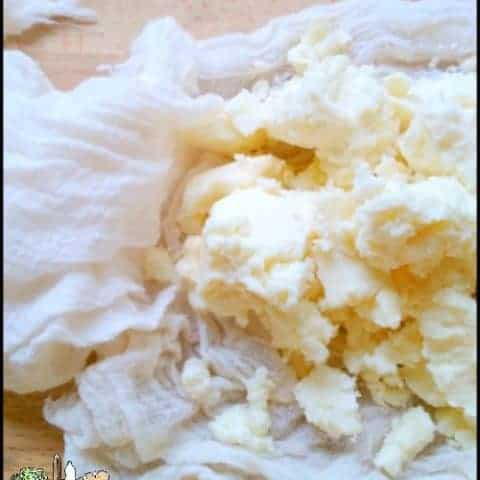
- Line a colander with cheese cloth and place it over a large bowl.
- Pour the contents of the pot through the cheese cloth and drain. Lightly salt the curds and mix thoroughly, if desired.
- Tie the ends of the cheesecloth and hang the curds for at least 4-6 hours, or until balled. It should be firm enough to slice.
Notes
My kids will usually just pull off chunks of paneer and gobble it down before I can do much of anything with it. No matter how much I make, we never have enough paneer!
If your family has more restraint than mine, a tasty way to use paneer is to cube it, sauté it in a pan with curry spices, and add it to your homemade Indian dishes. Paneer will absorb the flavor of your favorite spices quite nicely.
Can You Make Your Own Homemade Dairy Products?
Yes, you can! You don’t need a lot of experience in the kitchen to follow the instructions provided in this post. Even so, if you’re new to homemade dairy products, I suggest starting with one recipe. Make it several times until you get experience and are sure you know what you’re doing.
I’d like to note that these recipes are very suitable for children to either help with or make on their own. (A few require use of a stove, FYI). Getting kids started in the kitchen early is so important to their homesteading goals and future work.
PLEASE let them help and take charge in the kitchen. I know it’s hard when they’re young, but it’s so worth it when they’re making you yogurt once a week when they’re older.
If you don’t fancy the instructions we’ve given you here, try another recipe! There are many, many homemade dairy product recipes online and in books.
How Do You Make Homemade Dairy Products?
The first and most important step is to start with the best milk you can find. For my family, that means local, whole, fresh (or raw) milk.
If you prefer pasteurized milk, see if you can find a local producer. When you purchase local dairy, you’re supporting local economy and local farmers. Your farmers need your support!
You’re also providing for yourself within your immediate sphere. This means that you’re not dependent on grocery stores or their delivery trucks.
If you can’t find local milk, consider purchasing organic milk for these special recipes. The Picky Eater Blog can explain the benefits of organic milk vs. regular milk.
More Homemade Dairy Products Resources
Below are a few more articles that you might find helpful. If you have questions, be sure to leave them in the comments section below.
Homemade Dairy Products Resources


How to Make Milk Kefir
This is a quick, fermented food you can make on your counter! Drink as part of your morning smoothie, or add to your favorite ice cream recipes for a probiotic boost.


Homemade Drinkable Yogurt (Swedish Filmj�lk)

–>> Pin This Article for Later <<–


What great ideas. I order the same amount of milk from a local farmer every two weeks. Some weeks we just don’t drink it all and these recipes will help me make new things with it. Thanks!!
So glad it was helpful! Wasting any food is annoying, but letting dairy go to waste is like a crime against food. 🙂 What a blessing to have local milk!
Love this post! Thanks for sharing how many options there are for preserving milk out there. I love working with dairy!
Hello. Have you ever heard of Milk Kefir yogurt? Or Milk Kefir Labne (sp)?
I was recently in Los Angeles, where they are allowed to sell raw cows milk, at a Farmers Market, where they had Milk Kefir Yogurt for sale. It was the absolute BEST I have ever had!!!
I would love to make some back here at home in Oregon where raw milk isn’t legal in stores. (I bought some to bring back with me…Raw Milk!)
The girl behind the ‘counter’ said that it is not easy to make, but she could just have been trying to get more sales…
I love kefir!! It’s best with raw milk but you can culture store-bought milk with kefir, too.
As it is, milk kefir is essentially drinkable yogurt. You can flavor it with anything – fruit, honey, maple syrup, etc.
You can also make yogurt with milk kefir as the culture and the probiotics are amazing! I’m going to put a few links below and you can check them out to see if they answer your need.
How to Make Kefir Yogurt from Midwest Meanderings
Creamy Yogurt Kefir from Taste Great Foodie
Use Kefir as Yogurt Culture by Chelsea Green/David Asher
Incidentally, the last link is from David Asher’s fantastic book: Natural Cheesemaking
Tried to find this before posting. While the cheese is hanging should it be refrigerated or OK on the counter?
Thank you
Great question, Suzi!
Both the yogurt cheese and the paneer are ok to hang at room temperature while they drain.
Be aware that the warmer the environment, the more the cheeses will ferment while they hang. If it’s super hot in your house, this might make them a little tangy if you forget about them for several hours. The answer to this is simply to drain them only until they’re done releasing liquid.
So, for example, the instructions for yogurt cheese say to hang for 8 hours or overnight. If it’s summertime when I make this cheese, I usually massage the cheesecloth a bit to accelerate the release of the whey. During the wintertime, I let it hang overnight to increase the fermentation just a bit.
You may discover that you like a little extra ferment because it adds a tang you really like!
Let me know if you have any other questions – happy cheese making!
I love your website and its information. Please sign me up for any news letter updates. I have switched to raw milk for the past year and use an instant pot to make my own Greek yogurt with it. (The best!)
So – if I interpret correctly, I can take the cream from the milk, add my homemade yogurt, let it sit out 12-48 hours to get sour cream?
Oooh, I love Greek yogurt! Yes, you can take raw cream and culture it with yogurt or kefir to get a “sour” cream. The book The Art of Natural Cheese Making, by David Asher is extremely helpful for those wishing to use natural fermentation methods.
You can, of course, purchase a sour cream culture and follow the directions for making traditional sour cream. This will give you consistent flavor and texture. However, I prefer to use the ferments I have on hand to make my dairy cultures, so I make my sour cream with the method described in the article.
So glad you’d like to join our newsletter family! To do that, simply follow the link here.
I cooked my milk for over an hour on medium heat and never got to a boil, but it reduced by about 1/4. So I added the lemon juice and it did nothing. What could have happened?
I’m so sorry, Beatrice – how frustrating! Next time, turn the heat up bit by bit until you get a nice, rolling boil.
Each stove is different, so what’s medium to one stove could be medium-high to another stove. There’s also a difference is subtlety of heat between an electric and a gas stove.
Cheese making takes a lot of practice and experimentation to see what works in your kitchen with your products and tools. But, you WILL succeed!
I had a cheese making teacher once tell me that in order to make really good cheese, you need chickens and pigs. When we asked why he said, “Because you’re going to make bad cheese and you need something to do with it. Feed it to the livestock!”
Oh that’s Great!! We do have livestock. I will do that next time. Thank you for that. I am definitely going to keep trying. I need something to do with all our excess milk and this sounds like a great easy recipe.
So glad it was helpful! Let me know if anything else comes up and we’ll try to troubleshoot together.
By how much does each recipe extend the shelf life? Also, I will be using regular grocery store pasteurized milk, so if I make any of these recipes a week before the milk expires, vs one day before it expires, how will that effect the shelf life?
Good question! If you make the dairy product the day you buy it, give yourself an extra week to consume it, generally speaking. Yogurt will continue to culture past where you think it tastes palatable without it actually “going bad”.
If you make the dairy product the day before it expires, consume it within 5-7 days to be safe. Again, the dairy will continue to culture without spoiling for a bit longer, but it may ripen past where you want to eat it.
You will know the dairy product has spoiled if it smells rancid or develops mold.
I should add that the higher quality the milk, the longer it will last in general while still tasting delicious.
Thank you so much. I didn’t intend for this, but it looks like making yogurt and cheeses at home in my New Years Resolution now!
Ha – sorry about that! I think?
Yogurt is a great place to start – let me know if you need any help. Paneer is a super simple cheese that will ease you into more complicated cheeses.
Good luck and let me know if I can help in any way!
Is it possible to reduce the water content to where you just have cream at about 14-18%? Am wanting to make L reuteri yogurt which is calling for half and half but i can’t find an organic h&h anywhere and if it’s not organic it’s full of those unpronounceables.
That’s a great question! The truth is, you can use whatever clean dairy you have on hand – the culture is the most important part. If you can find raw dairy, it’s way easier to manipulate the milk and cream to create your own “half and half”. If you’re having to purchase homogenized milk, it’s a crapshoot.
Use whole cream, if that’s the cleanest thing you can find. The texture will just be thick – something between yogurt and butter. Sounds amazing to me!
Let me know how it goes, if you think of it!
My last batch was using 18% cream from dairyland which is labeled as coffee cream. It produced a real flavourful cottage cheese which i quite enjoyed!
So glad to hear it, Bradley – what a great idea!