Curious to know how to hatch chicks in an incubator before you spend the money to purchase one? Wondering if it’s worth your time to raise your own chicks? Let us answer the questions you have about hatching chicks for your egg and meat flocks with our tips, troubleshooting, and FAQs! (This post has been updated with more information since it’s original publication in 2016!)
Why Incubate Your Own Eggs?
I’ve wanted to figure out a system for renewing our poultry flock for several reasons:
- First, to find a solution to getting new chicks that doesn’t involve shipping from great distances.
- I was also hoping we could save some money by learning to hatch chicks ourselves.
- It was important to us to control the genetics of our flock, while culling bad roosters, to breed the best hens.
- I’m more inclined to let the broody hens raise up their own little chicks as often as they like. Having an incubator on hand and learning to hatch chicks could serve as a back up for my broody hens.
While all these points will help my laying flock, the bulk of our breeding program will be taken up with replacing meat birds. These are chickens we grow specifically to eat, as opposed to keeping them for laying.
Our family consumes a goodly amount of chicken in a year, so that’s a lot of birds. By learning to hatch chicks ourselves, I can quickly and easily replace broilers as we consume them.
More Chicken Resources for Later:
3 Best Places to Find Poultry for Sale
You’ll Need a Rooster to Hatch Chicks
Establishing a homestead-based breeding program means having a rooster, no way around it. If you’re in a city, be sure to check any regulations that might exist about roosters on your property.
Last year we got a rooster for the first time. Several breeds of roosters, actually, in order to test drive the male mystique in chickens as well as to figure out which variety we might like to have for breeding.
Montana Homesteader can help you learn how to tell if a chicken egg is fertilized.
A Few Good Breeds of Chicken
There are a lot of breeds that are considered dual purpose, good for eggs and meat. While other breeds are particularly heavy and yummy, and are primarily used for dinner.
- Our first try at a rooster was a Jersey Giant rooster to see if we could get a nice, robust bird. But it turns out their “giant-ness” comes in the height he gets from his long, skinny legs.
- We’ve also tried Russian Orlafs which are a lovely, lovely variety but not the buffest birds in the barnyard.
- Through the years we’ve a variety of Silkie roosters. Silkies have little man syndrome and are usually obnoxious.
- Barred Rocks are practically perfect in every way.
- Red Broiler roosters are a good size for eating but they are sort of dial tone birds – boring.
- Our favorites are Buff Orpingtons and/or Australorp roosters for temperament, health, and fertility. Both would be considered dual purpose breeds and they’re my favorite varieties of chicken.
How to Hatch Chicks in an Incubator
The following is NOT a replacement for the instructions found in your incubator. Always read the instructions and follow them precisely! Having said that, the following are some things I’ve learned about how to hatch chicks in an incubator.
With my rooster experiments, mostly what I learned is that roosters are a pain in the butt (literally sometimes). However, like I said, they’re a necessary evil if you want to start your own poultry breeding program.
Originally, I was trying to set up a natural breeding rotation with only a solid rooster and a few broody hens.
You can read our experience with Silkies here – they’re one of the broodiest breeds and certainly among the greatest mothers of the chicken world.
Incubator – Great Tool for your Breeding Program
Eventually, I realized that I was going to need an incubator, too. I’m just not in a phase of life that allows for a lot of time spent taking notes on birds and watching mating patterns.
So, after a lot of research and reading customer reviews on Amazon, we bought this one – the Farm Innovators 4200 series>.
- The automatic egg turner is a must unless you have, literally, nothing else to do all day but babysit your incubator.
- This model comes with a thermometer on the unit and a detached one for laying inside the incubator itself – the inside one was always more accurate.
- There’s a humidity monitor on this model, too – very helpful!
Collecting Eggs for the Incubator to Hatch Chicks
You can purchase fertilized eggs or gather your own from your flock. Remember, you must have a rooster to get fertilized eggs!
To increase your chances that the eggs you gather from your own flock are fertilized, pen your rooster with a few hens for several days. You can collect the eggs over those several days. Even the hen can take a few weeks to gather enough eggs to hatch out.
Do NOT put the eggs in the refrigerator as you gather them. Leave them unwashed at room temperature until you have enough to fill your incubator.
To Begin the Incubation Process
As I said, always follow the instructions on your incubator – always! The following is in no way meant to replace the information that came with your specific incubator. So, first thing – read your instructions!
Here are a few other observations and suggestions:
- It takes about 21 days for chicken eggs to hatch, so you watch and wait. Patience is developed waiting for baby chicks.
- As you’re waiting, check the temperature and the humidity level a few times a day and make slight adjustments to your dials, if needed.
- If you have little ones around, make sure you have a conversation about which parts of the incubator kids can touch and which parts are only for grown ups.
- Sometimes, things go wrong. The first time we hatched chicks in an incubator, we had one day where the ambient temperature shot up to ninety degrees (we’d been enjoying blissful, seventy degree days and then all of a sudden…!). I was so busy with other stuff that day that it wasn’t until the evening I noticed our incubator temp was way too high and they’d run out of water. I was so sure I’d killed all my chicks! Miraculously, we had a pretty decent hatch rate by the end – we got 13 out of 22.
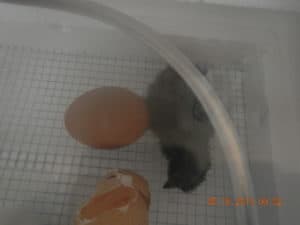
- The reward for all those days of watching and waiting is to hear the first peeps of the chicks still in the eggs, telling you they’re just about ready to come out.
 After a lot of peeping and rocking, the chick finally starts to emerge.
Finish Up Hatching Chicks in an Incubator
Once you have movement within the egg shells, here are some things to consider.
- Within about three days of their projected hatch date, remove the egg turner and place the eggs on the mesh.
- From there, they’ll start to rock back and forth a bit, then you hear the peeps, then they start pecking away at their shells.
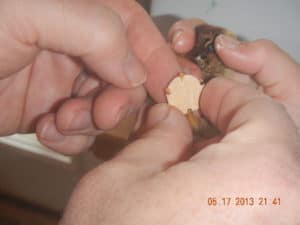
- You must NOT help them break the shell.
- Use a water dropper to add a drop of two of water to the pecked out hole if the chicks are struggling to make progress. Sometimes they dry out and get stuck, literally. The water drops have worked wonders for several of ours. However, all we did was add a bit of water – no touching!
This round, we lost two that started pecking but just weren’t strong enough to make it out of the shell, which means they weren’t strong enough to survive. Man this stuff can be brutal. But, wait, there’s more…
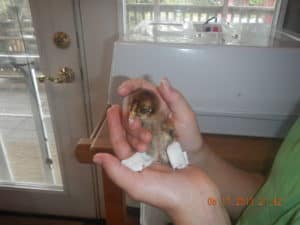
Wet and spazzy, the chick tries to figure out what just happened.
Chick Loss, Even When You Try So Hard
We had one hatch out with curled up toes; sweetest little thing but it just couldn’t walk. (If you have a similar experience, here’s a good article that might help.)

Severely curled toes; she couldn’t walk.
We tried splinting her feet to help her stand.
Splinting her little feet.
My ten year old (our resident chicken whisperer) worked with her for several days but the chick ended up passing. My daughter’s heart was broken – oh, we were all sad.
Not pretty but it flattened her feet.
It was particularly touching for us all this year that we have our own baby in the house. We can’t imagine losing our dear, little baby and so every loss is personal. Living with things that can die on you is a big part of this homesteading lifestyle, though. You HAVE to get accustomed to it.
I don’t think you ever get used to it but it can become a familiar pain.
I reminded my daughter that you can only love something if you’re willing to risk losing it. We’d rather have had our hearts broken than to have never loved and served that little chick at all.
It didn’t stop her from crying for a few days, but I know it’s a lesson she’s internalized just by living with and loving these animals.
Other Anomalies
Not nearly as sad, we had another hatch out yellow while all the other chicks were dark. This wasn’t an issue for a few days but by the second week, everyone was picking on him.
- This color prejudice can happen even in flocks of mature birds that the odd man out color-wise gets attacked.
- If this happens to you, relocate your chick to a new flock with similarly colored chicks.
FAQs of How to Hatch Chicks in an Incubator
Here are some of the questions we had when we first got started hatching chicks in an incubator. After we read the manual for the incubator, we actually felt like this process was going to be way too hard.
It turns out, it’s not to complicated a process – you just need to follow the instructions and get started learning!
How Long Do You Leave Chicks in Incubator After Hatching?
A chick can stay in the incubator up to 48 hours but it’s not a very hospitable environment for a live bird. I take mine out as soon as they’re dry, which is the bare minimum amount of time.
You can leave them for a bit longer so that you aren’t opening up the incubator too often and letting out all the warmth and damp.
- Souly Rested can tell you about the mistake she made incubating chicks by leaving shells behind!
I place them immediately inside a chick brooder with chick feed, water, shavings, and a warming lamp.
If I have a broody hen who has been unable to hatch her own chicks for whatever reason, I place some newly hatched incubator chicks under her. She will usually accept these babies as her own and start to teach them how to eat and drink.
I’d rather a mother hen provide this education because they learn it much better than they would from me!
What Percentage of Chicks Hatch in Incubator?
The answer to this question is very relative. Here are some things you can do that will result in higher hatch rates:
- Keep the humidity and warmth inside the incubator consistent.
- Don’t bump the incubator and be sure it’s placed in a safe spot.
- Educate your children on proper treatment and use of the incubator.
- Purchase a solid, reputable model of incubator that has many positive reviews.
If all the conditions are right, you can anticipate a hatch rate of between 70% and 80%.
How Long Until a Baby Chick Hatches if Incubated Right?
Gestation takes 21 days.
However, if the eggs cooled down a bit on your counter while you collected enough to fill the incubator, it might take a day or two longer than twenty-one.
Also, the first eggs you gather will have sat a few extra days on the counter while you collected enough to fill the incubator. These might hatch a few days before the last you took.
I always wait a few extra days to see if I get any more hatches beyond the 21 days from the moment I turn on my incubator.
Why is My Chick Pipped but Not Hatching?
If the embryos develop to the pipping stage (the first shell cracking at hatching), they are normally healthy enough to hatch. Just give them time.
However, there are a few things you can check to ensure hatching finishes.
- The chicks need really good oxygen content in the incubator while hatching. Don’t close the vents! If you need to keep the environment humid, use other methods besides closing the vents.
However, if the humidity decreases after the chick breaks, or pips, the shell, the membranes within the shell can dry-out and stick to the chick. This essentially glues the chick to the inside of the shell and stops the hatching process. The chick eventually dies.
This condition can occur in minutes, usually when the incubator is opened to remove other chicks that are hatching.
- Be sure the proper internal conditions have been achieved inside the incubator by day 21, and then monitor it. Keep the door closed until all the chicks have been hatched to ensure conditions remain steady for the other chicks.
Place them in the brooder once they’re all hatched and dry.
Can You Touch Baby Chickens After They Hatch?
The answer to this question is yes and no. If the chick is in distress or is ready to be moved to the brooder, you can pick it up and move it.
If the chick has hatched and is still drying, leave it be to complete this process on its own inside the incubator. It was just born – give it some space even though it’s so cute.
- Over the next few days and weeks, you may handle your chicks very gently. Scoop them up and allow them to rest in the hollow of your hand, and be careful not to squeeze them to hard.
- This instruction must be given to small children and repeated often.
- Never handle the chicks while they are receiving instruction from a mother hen, if you have one on staff. This is important chicken time and they need to concentrate.
Remember to wash your hands before you handle chicks to prevent possible contamination.
What to do When a Chick Hatches in an Incubator?
Once your chicks are hatched, you’ll need to provide for their care as you would any chick. Be sure to have a chick brooder set up beforehand. Get the lights turned on and the air warmed up!
- Here are Six Easy Chick Brooder Ideas from Timber Creek Farmer.
- For when the chicks are ready, here’s how to set up an Outdoor Brooder from Fewell Homestead.
Mother Hen for Hatched Chicks
A much easier option for hatched out chick care is a broody hen. If your hen is broody and doesn’t have her own eggs, using her as a surrogate mother is THE best and easiest option!
We put our hatched chicks under our broody Silkie, Snowy, in our chick pen so that she could raise them. She’s done this for us in the past. After having her raise our last few batches of chicks, I’m just so over taking care of chicks myself! I’m a good human mommy. However, it turns out I make only a mediocre chicken mommy since I know very little about eating dirt and looking for bugs and sleeping in straw.
Silkies are the Best Mother Hens
I wish I could had a picture of Snowy and the chicks at night. They pile under and over mamma so that when you approach the brooder, little heads poke out from all over Snowy.
If you picked up mamma, babies would fall out from under her like chicken rain. Unfortunately, every time I tried to photograph both scenarios, the chicks would scatter and Snowy would get pecky.
Snowy is still tending the twelve adolescent chicks we have left out in the barnyard now. To be honest, I think we overwhelmed her with so many babies. She usually only sets a clutch of three of her own!
They’re older now and have more attitude. They can fit through the fence, so they go off exploring where she can’t follow and keep them safe. This drives her batty!
But she still makes room for them on cool nights, despite the fact that the chicks are almost as big as she is now. They’re all standard-sized chickens and she’s a pint-sized Silkie. I love how she diligently keeps them in line and looks out for them and teaches them.
What difference does it make to her that they’re not technically her kids? Love really is the universal language, whether used by people or chickens.
Do you have any chicken fostering stories you’d like to share? Just let us know about them in the comments!
–>>Pin This Article for Later<<–


We did our third batch in the incubator this week. 🙂
Like you, we were totally newbies at it as well. Our first hatch had a 45% viability and we were not so impressed. The last batch had a 63%. Turns out that is pretty good with a home incubation process. 🙂 We are trying to do 3 different breeds this year to see which ones we like the best. (Americanas – that I got from our own hens, Giant Black Cochins, and Barred Plymouth Rock) I would love to try some Buff Orpington, or some Favoriles (sp?) as well, but the season for that is now over so next year it will be.
Isn’t living and experimenting on the farm fun?! I pretty much love it!
I’ve never had Cochins but I love Americanas, Buffs and Barred Rocks; let me know if you end up with Favaroles…
Wish you were closer!
I am incubating my first batch of quail eggs right now. I have NEVER done anything like this before and find myself wondering about them, checking them constantly, monitoring temperature and watching my lovely 3 year old telling me all about how the baby quail “have to peck OUT of their shells, mommzy. OUT, not in!” (Well. Thank heavens she’s around to set me straight.)
I’m hoping for 50% hatch rate. I’m so glad I found this post. Thanks for making a newbie feel a little more comfortable with this process!
By the way – loved how you explained about loss to your tot. About love and risk. Right on. Good way to say that.
Yes, 3 yr olds make things better! Good luck and let us know how it turns out…
I miss hatching chicks since we moved to an apartment. Thank you for linking up at Wildrafting Wednesday.
Great post, I hope you’ll come share at our From the Farm Blog Hop:
https://www.fresh-eggs-daily.com/2013/06/from-farm-blog-hop-39.html
Lisa
Fresh Eggs Daily
http://www.fresh-eggs-daily.com
We incubated a couple of batches and although I don’t recommend helping a chick out I did have to do that. The humidity was so very low that the membrane was stuck to the chick. It had started the hold and the shell had separated from the membrane. I just peeled off the shell leaving the chick in the membrane, got a flour sack cloth wet with warm water and rehydrated the membrane. The chick was able to break out except for a piece stuck to its head. I dripped warm water on it and the membrane came right off. It’s doing wonderfully now.
Thanks for sharing on The HomeAcre Hop! Hope to see you again today at:
https://www.theselfsufficienthomeacre.com/2013/07/the-homeacre-hop-26-new-co-hosts.html
I just set my first batch of eggs last Friday. This will be my first incubator hatch in over 30 years! The last was way back before air circulating fans and automatic turners, heck we didn’t even have humidifier trays, you just poured water in the whole bottom and put a wire mesh on little blocks to keep the chicks up out of it. I am very excited to see how this turns out!
We have a lot of fun incubating eggs! We have never had curled toes, but now we will know what to do if that happens to us. Thanks for sharing with us at Eco-Kids Tuesday! I hope to see you again today! https://likemamalikedaughter.blogspot.com/2013/07/eco-kids-tuesday.html
I have had chicks that started to peck the shells, but then fail to complete the process and die! What am I doing wrong?
Argh – that can be so frustrating, George! First of all, deep breaths and try to remember that even mama chicks don’t always get 100% hatch rate. Next thing to do is to be sure you’re carefully monitoring the humidity and temperature in the incubator, especially during hatch. This is THE hardest part of incubating successfully. I suggest you get two to three thermometers/hygrometers and take an average between them to get a good idea of where your incubator is registering. Each incubator is different, even in the same brand; your ambient temperature and humidity will make a difference, too.
For the first 18-ish days you usually want around 50% humidity; then for the last days until hatch between 65% and 70%. However, you’ll need to experiment with your climate and your incubator to see what gives you the highest hatch rate. Sadly, trial and error is the best way to figure it out. From the little bit you’ve typed in your question, it’s possibly you need to stay at the higher end of that humidity level – chicks need the damp air to peel themselves out of those shells.
Temperature drops and rises can cause equal damage. It’s so hard to keep everything even because just when you get the temperature and humidity correct, it changes! Keep working at it, take good notes, make sure you have at least two instruments to read temperature/humidity and I know you’ll get it. Read around the internet, too, and see if someone has tried something you haven’t yet.
I hope that helps?