 Anything I’m passionate about usually finds its way into the schoolroom, so the kids and I have been experimenting this week with natural dyes from the children’s garden.
Natural Dyes
There’s something wonderful and healthy waiting for you and your children out in the garden! I love the dirt and so do my kids. Fit as a Mama Bear will even explain to you why letting your children play in the dirt is healthy! Just recently, my family had a lot of fun playing around with natural dyes when we colored our Easter eggs this year and now, everywhere we go one of us will say, “I wonder if we could make a dye out of that?”
For the school lesson, we talked a bit about what a mordant does and why you want to prepare the textiles you’re dyeing beforehand in a mordant bath. We also talked about how to make the dyes stick to the fiber through the dye process and after you launder the materials. My oldest daughter’s goal is to find the best natural dyes for tie-dying a shirt.
Which Plants Make Natural Dyes?
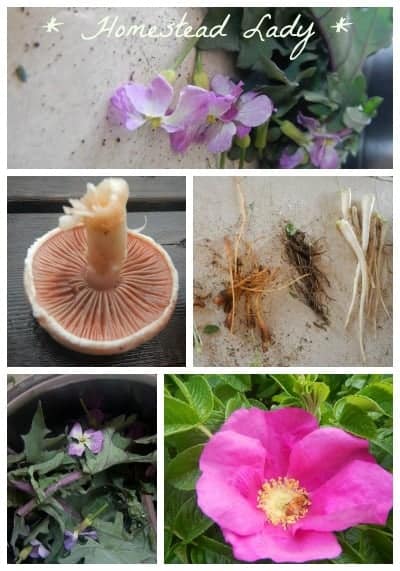
We began by gathering the materials to make natural dyes. I told the kids they could take anything they wanted from the children’s garden. The plants they gather for natural dyes included:
- dandelion flowers
- borage flowers
- borage root
- grape hyacinth flowers
- kale leaves
- mushrooms
- chamomile
- Rugosa rose petals
- baby California poppy roots
- a handful of mixed greens (poppy tops, radish tops and kale).
Pretty much anything will make a color but whether you like the color, and whether it will actually stick to your fibers, is where the experiment lies.
Make a Natural Dye
The first thing you’ll need is a good book. We have a whole post on a great natural dye book called, A Garden to Dye For
Make a Dye Bath
To make a very simple dye bath for natural dyes:
- Put the plant material in a pot
and cover it with water.
- Bring your pot o’ stuff to a boil and then simmer. We used both the stove top and the solar oven
to heat our dyes baths.
- Prepare your fibers by washing them. Make sure they’re damp before you put them in your dye vats.
- Strain out the plant material from your pot and compost it.
- Add a mordant
to your dye pot. You can use your natural dye book as a guide to figure out how much. We used about 3 teaspoons of alum and 1 teaspoon of cream of tartar for every pound of fiber we were putting into the vats. Protein fibers (like wool) react differently than plant fibers (like cotton) with different mordants.
- Keep the vats warm/simmering as they dye your fibers.
- Once the fibers have reached the color you want, remove them from the heat and let everything cool down.
- Rinse the fibers in cool water until the water runs clear. You can spin out the fibers in the washing machine to remove the rest of the water.
- Make sure you label everything from fiber to dye plants to mordant used. If you find a color you really love, you’ll only be able to recreate it if you take good notes.
How We Ended Up Heating Our Vats
So, a few natural dye baths (the grape hyacinth, chamomile and dandelion flowers) I brought to a boil and simmered for a few minutes. (I’d make a terrible professional scientist – “a few minutes” was however long it took me to bandage a knee, feed the baby and start a load of laundry.) Then the kids and I transferred each dye bath into a mason jar with a lid.
However, these three below we set in the sun to infuse. This kept them hot, but not necessarily simmering. They stayed in the sun until it moved, which ended up being about four hours.
The other natural dye baths (mixed greens, kale, borage flowers, borage root, mushrooms and poppy root) were also brought to a boil in individual pots, then simmered for a bit. (This time it was however long it took me to find the five-year-old’s shoes, change the baby and hang up a load of laundry to dry.) We transferred these to individual mason jars, too, and capped them with a lid.
We made sure to label our lids – I was so proud of us for remembering! These ones we put in the solar oven while we were gone. When we came home and took them out, the water was bubbling it was so hot.
Color Fast – Does the Color Stick?
These lovely flowers were prepared first by pouring boiling water over them and letting them steep in a glass jar. Then we got busy and didn’t do the rest of the experiment until a week later. So, include that in your notes if you want to fiddle with it yourself:
“Homestead Lady ignored her grape hyacinth dye bath for a week in the fridge.”
During that time, the dye went from mild indigo to pinky-purple. This dye turned out to not be color fast on the cotton/poly blend. Not being color fast means that it faded off the fabric after washing. It was color fast on the wool, though.
And, like all the other colors, for whatever reason, the color stayed on an elastic lace that bordered some of the fabric scraps. You’ll be able to see that in the pictures as we move along.
Results of Natural Dyes
The results were all lovely, we thought.
Dandelion, Hyacinth and Chamomile
Here’s the dandelion flower, grape hyacinth and chamomile.
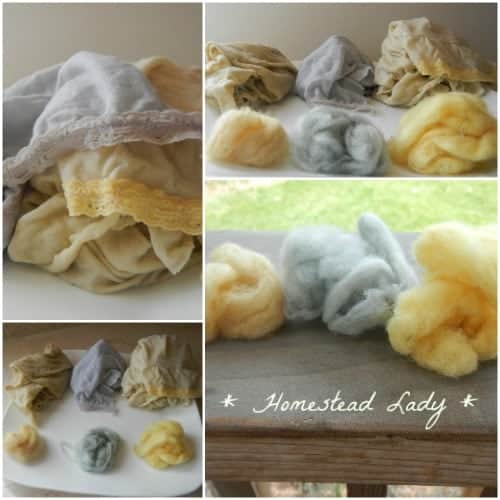
The loose fiber in all these pictures is wool roving and the fabric is a cotton/poly blend.
Polyester
Note that polyester is mixed with the cotton and polyester is notorious for not absorbing natural dyes. I just didn’t happen to have 100% cotton rags because most of our rags come from clothes and polyester is in nearly everything these days. Interestingly enough, like I said, the elastic lace that bordered these rags soaked up the dye beautifully, producing great colors. Even when the cotton/poly blend was looked practically undyed!
Just a side note, the chamomile dye bath smelled heavenly. I could barely tell the difference in color on the cotton/poly fabric between the dandelion flowers and the chamomile until I smelled them and knew instantly which one was chamomile dyed.
Mushroom, Rugosa and Mixed Greens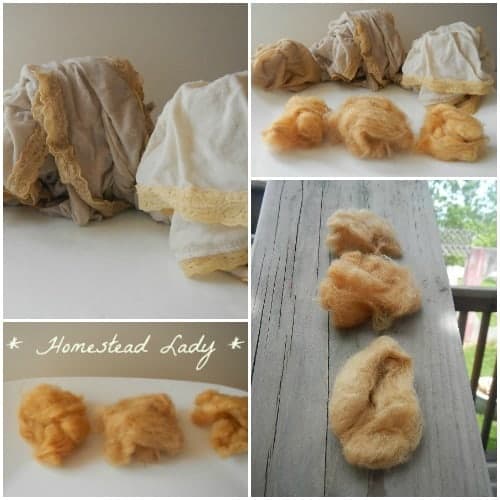
The mushrooms leaked red liquid while being prepared and the dye bath started out pink-ish. However, the mushrooms ended up producing a nice range of deep tans/light browns. It had a yucky smell, though, fyi.
The rugosa rose petals produced a heavily perfumed dye bath that had a reddish hue. However, the petals turned the fibers to various shades of tannish yellow.
I’m curious if the heat had anything to do with that and if I tried solar infusing the natural dye from the rose petals, if I’d have better luck getting that red color to stay reddish. Need to go research that (between washing the dishes and planting the peas – what? It’ll all get done).
The mixed greens also smelled rank (probably the presence of the kale), but the yellowy tan color they produced on the wool was lovely. They produced a pale yellow on the cotton/poly.
Poppy Roots
The California poppy roots were so young that they dye wasn’t very strong, although the roots are bright orange when they’re older. We decided we want to try that one again when we have more mature roots and when we can try the petals.
We’re finding, though, that quite often you’re so sure you’re going to get one color when you end up with something totally surprising! The most common colors for natural dyes seem to be yellows and browns.
Cream of Tartar Odd Reaction in the Solar Oven
The only other weird result was with the cream of Tartar. I put some into the bottom of each dye vat jar we put in the solar oven. The cream of Tartar ended up crystallizing on some of the fibers during the soak. We couldn’t figure out why except that maybe the solar oven caused the reaction some how.
The California poppy roots had very little liquid left by the time I took that jar out of the solar oven and the cream of Tartar crystals that had formed were impossible to get off either set of fibers. In the kale bath, though it still had plenty of liquid, the crystals did the same thing.
Any chemists out there want to tell me what happened? I’m guessing the higher heat had something to do with it.
Random Fact
Random, interesting fact: the kale dye bath went from brown to pink when we added the cream of Tartar to it. No big surprise to anyone who’s ever dyed with red cabbage (a cousin of kale’s) and added vinegar to it – poof, color change! In spite of that, we got a tan color from the kale bath.
Remember to Label Everything!
With all the rinsing and washing and moving fibers around we had a hard time keeping track of which color was on what fiber. So, we got a cookie sheet to lay the wool fibers out on and took the labels from the jar lids, sticking them next to each colored bunch. We also decided to label the clothespins we used to hang the cotton/poly up to dry.
Those were our latest experiments with natural dyes from the children’s garden – have any suggestions on what we should try next? We’ll have some ideas on various things to plant in the children’s garden for dye coming up pretty soon, both for shady and for sunny areas. 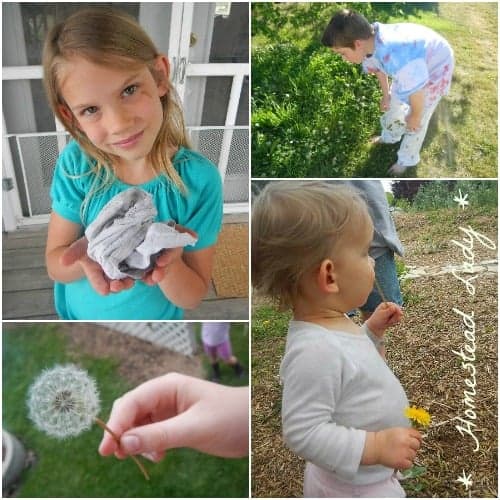
Plants Have Secrets To Tell
The best part about this project to me was watching the curiosity ignite in my children. Suddenly plants had secrets to tell and every dash into the garden became a treasure hunt.
I let them try stuff I knew wouldn’t work because its important to have failures as much as it is important to have successes. In fact, you don’t recognize the one without the other.
If you don’t have children in your house, borrow some because this was such a fun thing to do with kiddos. It would, however, be equally cool with a close friend or sweetheart. See who can find the colorfastest (yeah, its a word, because I typed it) plant or the craftiest thing to do with the dyed fibers.
Or, is it only us garden nerds who do stuff like that in our free time? To learn how we made our May Day gifts, visit our post at Hobby Farms – click here.


Tessa, this is lovely. I used to knit a lot, and miss it terribly. I’ve always wanted to learn to dye wool with natural materials, and you are reawakening my knitting and dying obsessions! Pinned, just in case I do get back into this!
Thanks so much, Janet! You can blame Chris, though – she’s the one that got me started and I’m slightly annoyed. I do have other things to do besides make dye baths, after all – its addictive. 🙂
What a great experiment! The list of “things to do this summer” grows and grows… 😉
Oh, so very fun, Christine! We have all kinds of plans for crafts and gifts. We celebrate Leon Day (Noel backwards and the halfway mark to Christmas) by figuring out what gifts we’re going to make for Christmas. Our dyed stash will come in handy!
What a fun project! Thanks for sharing at Simple Lives Thursday.
One thing to try – often heating to the point of boiling denatures the dye compounds in the dye stuff and you end up with browns and tans. Instead, try heating your dye bath to 180 degrees and holding it there w/o boiling for a couple of hours and then, add some alum. I find that the alum causes the color on the material to be more opaque and the likelihood of getting greens and yellows is much higher at slightly lower temps.
Thanks for the great tip, Andrew! I was just gearing up for this year’s dye experiments – it always seems to start with St. Patrick’s Day and then Easter. I’m no the hunt for natural green dyes which are, of course, hard to land on. I think I’ve got frosting covered and I can manipulate with copper for fibers, but a good green Easter egg dye is proving elusive.
Thank you so very much for these directions. I am getting ready to dye Easter eggs today. I have kale and purple cabbage in two pots coming to a boil. The smells from the kitchen are very aromatic. I can going to using Chai tea later.
How fun! My kitchen was quite fragrant yesterday for the same reason. 🙂
This article might be a little more helpful for egg dyeing: https://homesteadlady.com/easter-eggs-natural-dye-vs-natural-dye/ . With natural dyes, you have a few more steps when dyeing eggs. You may have already done this but popping your blown eggs into a vinegar bath can help dissolve the protective coating over the eggs – you really only need to do this with farm fresh eggs, though. Pull them out of the bath and rub them down and you should be good to go. Sometimes, you’ll still pull an egg out of a beet dye bath, for example, only to have some of the color rub off. Farm fresh eggs are just SO fresh! No worries, rub off what will rub off and do it again.
If you’re using commercial eggs, you should be fine since they’re washed repeatedly.
Have so much fun and let me know if you have any questions!